U-Poser ® Reference and Help Guide

    Web Site Updated 2-19-2011
    Current U-Poser version 2.5.4


Home
Overview
Size/Shape
Setup 0
Setup 1
Setup 2
Setup 3
Setup 4
Setup 5
Setup 6
Setup 7
Setup 8
Setup 9
Save
Load
Misc
Advanced
Pose
Player (Animation)
Options
Mannequin
Advanced
Downloads
Help
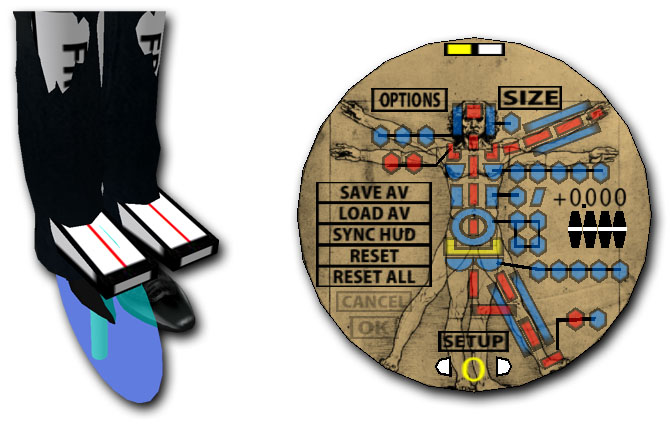
SIZE/SHAPE >> SETUP 0

Setup 0 - 1
Begin by rezzing or dragging the U-Poser Mannequin from your inventory into SL. If you are sizing/shaping an Avatar for the first time click POSE which flips to the SIZE side. Click RESET ALL and then click OK. This resets all values stored in the HUD to default values. Please note that sizing is easier when the Avatar is wearing tightly fitting clothing. Right click (command-click Mac) on the Mannequin and select U-Poser from the menu. Click SETUP on the HUD to load the first setup pose - Setup 0. All limb buttons are red except except one is yellow. Blue buttons indicate (advance sizing setup) and will be covered later. The three reference attachments included assist in lining up parts of the Avatar with the Mannequin. These copy/transfer reference attachments are: reference head, reference right hand and reference right foot. Move these attachments to a new folder to make it easier for transfer to other Avatars. The Avatar being sized right clicks the attachment from their inventory and selects Add. Avatar right clicks the Mannequin and selects U-Poser from the menu. The setup should appear as follows:


Setup 0 - 2
Approximately align the Avatar with the Mannequin by adjusting the parts of the Arms, Legs, and Torso (highlighted in red on the HUD). For example: if the Mannequin's leg is shorter than the Avatar's leg increase the length of both Upper Leg and Lower Leg (the Mannequin parts should be approximately the same as the Avatar). The Mannequin may be adjusted by selecting the limb on the HUD and then using the up/down arrows under each number. First arrow is +/- 1, second is +/- 1/10, third is +/- 1/100 and the last set is 1/1000. Same is done with Upper Arm, Lower Arm and Torso.


Setup 0 - 3
Select the Hip Width (yellow indicates limbs to adjust for a setup pose). Line up the red line on the Mannequin's foot with the disk on the Avatars's foot.


Setup 0 - 4
Once aligned click the right arrow under SETUP to move to setup 1.


NEXT

©Copyright 2011 U-Poser. All rights reserved. No part of this document may be reproduced without permission of U-Poser creator. Second Life, SL, and inSL are trademarks of Linden Research, Inc. U-Poser is not affiliated with or sponsored by Linden Research. Mac and Mac OS are trademarks of Apple Inc., registered in the U.S. and other countries. Windows is a registered trademark of Microsoft Corporation in the United States and other countries. All products are trademarks of their respective companies. Specifications subject to change without notice.